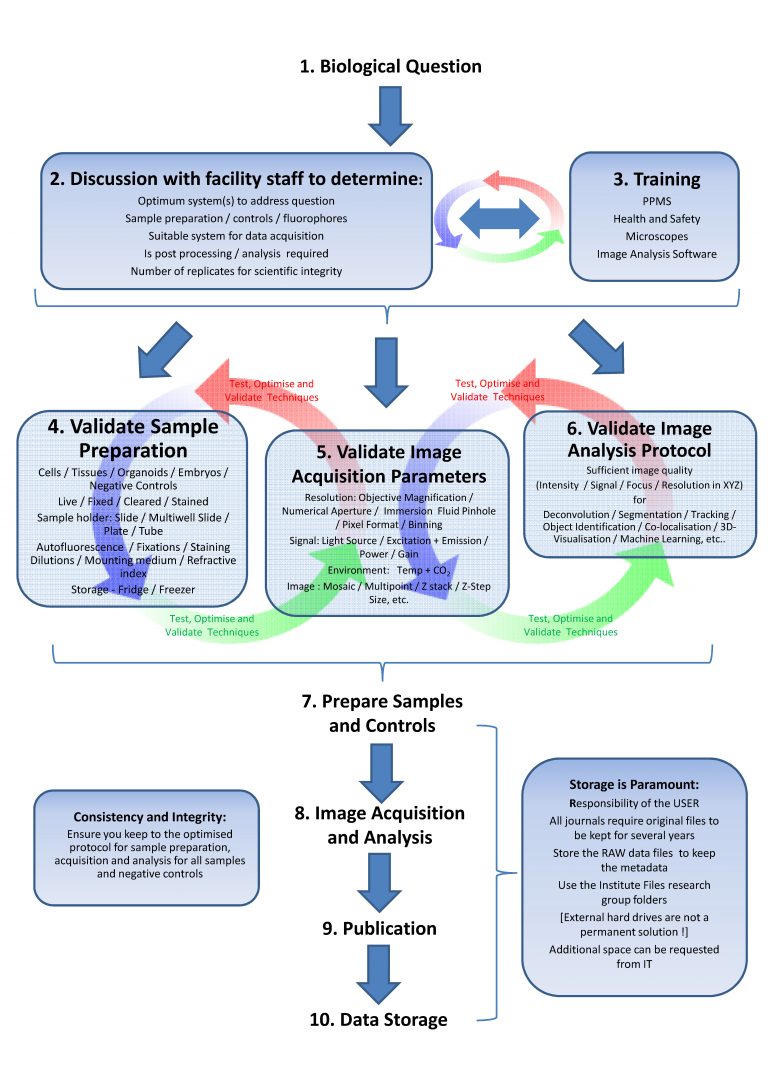
Each step of the flowchart is crucial for the quality of the data you will extract following the image acquisition. You are strongly advised to follow these guidelines as overlooking may jeopardise the end results and weeks of work.
In doubt, you can discuss any of the following steps with the facility
1. Biological question
It is important to start with a precise question before going to the microscope. Remember that microscopy can be slow and that extracting information out of pictures is not straightforward. Do not neglect other techniques such as FAX.
2. The microscopy protocol MUST be designed with respect to the biological question. It is unrealistic to make a single image to answer different questions. The microscopy protocol must account for the following points:
a. What resolution is needed? Hence, which objectives? NA? Working distance?
b. Filter sets/laser lines available for imaging? Is there any possible cross talk during imaging?
c. Environmental conditions. Do you need CO2? A temperature controller? Will you require long term focus stability?
d. Optimisation: If some of these parameters are difficult to assess, a test run should be done. Optimising now will save you a lot of time later.
3. Sample preparation protocol
a. Remember that compromising the sample preparation will lead to compromised images
b. What do you image: Live cell imaging, fixed cell, and fixed tissue? How are you going to fix your sample? is auto fluorescence a problem (try other fixation method ?)
c. How will you mount your sample? Slide, dish, multiwell? You should always use number 1.5 coverslips, and try your best to have your sample directly located on the coverslips. The choice of mounting media should be driven by index matching with the objective
d. Immuno staining and fluorescent protein may behave very differently with respect to fixation and mounting medium
e. Optimisation of preparation protocol is worth doing i.e. try different dilution, mounting media, fixation methods…
4. The use of advanced techniques (not mastered) will likely lead to no or false results. You are advised to read up on the techniques you are interested in and discuss them with the facility. A test run is almost always necessary.
5. Acquiring data and hoping that you will find a result via image processing later does not work. You should make sure that the images that will be acquired will be suited for the image processing, and that the image processing methodology works. You should ask yourself, what processing do I need, what image contrast will I require (for segmentation for example), do I need tracking? Do I want to do batch processing?
Remember that test imaging and processing will need to be optimise iteratively.
6. Sample and controls preparation
a. Use CLEAN SLIDES and clean coverslips
b. ALWAYS prepare negative controls.
c. You should image your sample fresh as storage may decrease the fluorescence.
7. Image handling
a. Acquisition should be as close to your protocol as possible. Any change in the acquisition protocol at this stage could jeopardise your results.
b. For quantitative work, imaging parameters should be conserved between conditions
c. Image enhancement and filtering is usually not necessary. Beauty does not contain more information (usually less)
d. Image processing should be as close to your protocol as possible. Extra data mining is not always possible as the imaging is not necessarily adapted.
e. Do not hesitate to show to the facility your publication data for assistance in presenting them.
8. Data storage
a. REMINDER: Data storage is at the sole responsibility of the users
b. STORAGE IS PARAMOUNT
c. You should conserve the native image files as they contain all the meta data (Tiff files do not!).
d. Some journals require that the original files are kept for several years after publication
e. Storing data on a USB stick or an external hard drive is not a permanent solution. You will have data losses. You should keep several copies of your files on different supports, and preferably in different places.
Scheme from light microscopy facility Cambridge UK: